Access Microsoft Azure Quantum over HTTP Requests
An exploration of Azure Active Directory and REST APIs
 Microsoft Azure Quantum
- Background
- Computer Networks Basics
- A First Try: Manually Login is Required for Acquiring Access Token
- OAuth 2.0 Client Credentials Flow: Using Credential for Acquiring Access Token
- Submit Quantum Jobs Using HTTP
- Misleading Documentation
- Conclusion
Step into a world where the impossible becomes reality and computing takes a quantum leap. Quantum computing, the enigmatic frontier of technological innovation, holds the promise of solving complex problems that leave traditional computers in awe.
Nowadays, small groups and individuals cannot afford quantum computers. Thanks to the development of cloud computing, people can access quantum computers through a lot of cloud platforms, such as IBM Quantum, Microsoft Azure Quantum (MAQ), and Amazon Braket.
MAQ is the cloud quantum computing service of Microsoft Azure (the cloud computing services provided by Microsoft), with a diverse set of quantum solutions and technologies. Though my experience is more on IBM Quantum and Qiskit and IBM is one of the leading companies in quantum computing, its quantum computers are superconducting quantum computers, while MAQ provides access to more quantum computer providers with various types of qubits. Currently, its providers include trapped-ion quantum computer companies: Quantinuum and IonQ, superconducting quantum computer companies Rigetti and Quantum Circuits Inc, and neutral atom quantum computer company Pasqal. Since my research area is in quantum computer security (a very early and new area if you have not heard before) and I often need to consider and utilize hardware features for security and privacy research, a wide range of qubit implementations will provide me with more thoughts on my research.
Background
Recently, I want to run the code locally to get information from MAQ. Since it is one of the Azure services, it can usually be done by using modules such as azure-quantum Python module, or Azure tools such as Azure Command-Line Interface (CLI).
However, every time run with azure-quantum, a login page will pop up and I need to manually log in to it to get the access token. On the other hand, for Azure CLI, I want to implement my own code to do custom things, while it is hard to port CLI to my code. In addition, while azure-quantum provides many APIs for information retrieval, it still lacks access to some information that I would like to gather.
One option to retrieve all information that I can get from the Azure portal is through HTTP requests, since the portal requests data in this way. So my goal and also the main contents of this article are to interact with Microsoft Azure, especially MAQ, using HTTP requests.
Computer Networks Basics
HTTP and How You Browsing Websites
Let’s begin our journey with the cornerstone, Hypertext Transfer Protocol (HTTP). Picture it as the highway on which information travels over the internet, guiding our data from the browser to the server and back again. It’s like the paperboy of the olden times, who knew precisely which door to deliver your morning news to.
When you are using browsers surfing the internet, such as YouTube and Twitter, browsers actually send HTTP requests to servers which are the machines hosting websites, and servers deal with the requests and send back responses to browsers. Browsers finally process these responses and represent them to you, and you can see the website now!
HTTP is Stateless
However, You may know that HTTP is stateless, which means HTTP does not save its user-specific details for a personalized experience. To maintain the state, cookies, session, or token is usually used.
‘Cookies’, the small, self-contained pieces of data stored on your browser. Just like a store owner remembering your face and your regular order, cookies help the server remember your preferences to tailor the user experience accordingly.
In our virtual world, however, the server suffers from a peculiar kind of amnesia. It forgets you once the HTTP request is completed, hence, we need ‘Sessions.’ Think of it as your very own VIP pass, keeping your place in a concert so you can come and go without losing your privileges.
Now, to ensure the authenticity of the users and protect them from fraud, we introduce ‘Tokens’. Much like a secret handshake, they are unique identifiers issued by servers to authenticate users. ‘Bearer tokens’ are a type of access token that is given to the user to access the resources. These tokens are called “bearer” tokens because the bearer of this token will be granted access.
Though all these methods have different implementations, the idea is that the server and the client share and store some secret information. Whenever the HTTP requests are sent, it includes this information. Servers check this information after receiving the requests, and then decide from which places they were sent or whether the senders are the ‘correct’ senders.
REST API
Our performance wouldn’t be complete without the Representational State Transfer Application Programming Interface (REST API). It’s a set of rules that allows different software applications to talk to each other, akin to a universal translator in a cosmopolitan city.
More practically, you can think REST APIs provide places to retrieve data. They often provide URLs for you to simply retrieve data from the database. For example, if one server exposes the URL ‘https://www.yourdatabase.com/items/12345' with REST APIs, you can send HTTP GET request to this URL to get the information about items 12345 in your database.
OAuth and JWT
No conversation about web security would be complete without mentioning OAuth 2.0, the bouncer of our digital nightclub. This protocol allows third-party applications to access your information on a platform without exposing your password, much like how a club bouncer checks your ID but doesn’t need to know your date of birth.
And lastly, let’s meet JSON Web Token (JWT), an open-standard method for securely transmitting information as a JSON object. Consider it like a sealed envelope, carrying a secret message that can only be opened and read by the right person with the right key. This may include the token I mentioned previously.
Microsoft Azure Quantum REST API
By checking Azure Quantum REST API reference, the commonly-used OAuth 2.0 is also used for MAQ. Further checking shows that Bearer Authentication is used for the HTTP authentification.
So the goal is to get the Bearer token and then use it for the following requests.
A First Try: Manually Login is Required for Acquiring Access Token
I first tried to use azure-quantum Python module for access. One example is below, which lists all jobs:
from azure.quantum import Workspace

subscriptionId =
resourceGroupName =
workspaceName =
location =

workspace = Workspace(resource_id = f"/subscriptions/{subscriptionId}/resourceGroups/{resourceGroupName}/providers/Microsoft.Quantum/Workspaces/{workspaceName}", location = location)

print(workspace.list_jobs())
However, if you run this code, a web page will pop up and you have to log in to it to get the Bearer token, as I mentioned before. My goal is to get the token without manually logging in to this page.
OAuth 2.0 Client Credentials Flow: Using Credential for Acquiring Access Token
Microsoft Azure provides many ways for OAuth 2.0 authentication. One way to acquire token without login is to use the client credential grant. The process is shown in the figure below:
The client (actually shown as the ‘Web Server’ in the figure) will interact with 3 parties:
- /adminconsent: this is the party that grants the client the permissions, together with
tenant_id,client_id, andclient_secret. These three values are needed to acquire the access token. - /oauth2/v2.0/token: this is the party that gives the client the access token.
- Web API: this is the party that provides APIs. In our case, this is the Azure Quantum REST APIs.
/adminconsent: Application Registration
Application Registration
To get tenant_id, client_id, and client_secret, we need to first register an application on Azure Portal. Follow the steps below:
Navigate to Azure portal: First, head to the Azure Portal, the starting point for your journey.
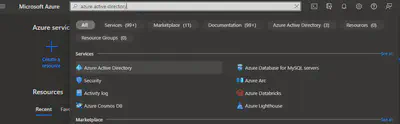
Access Azure Active Directory: Look for the Azure Active Directory (Azure AD), your destination in the portal. Once found, access it. You can find it by searching it on the search menu at the top of the portal.
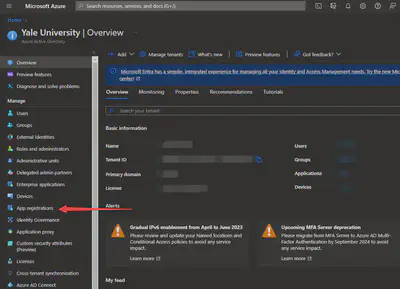
Enter App registrations: Here, you’ll find the ‘App registrations’ section under ‘Manage’ on the left of the page. Click on it to enter.
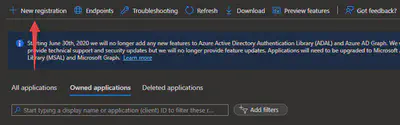
Register your application: Now, you’re ready to register your application. Choose ‘New registration’, enter a suitable name for your application, and select the supported account types based on your needs. Note: Please select the correct ‘Supported Account Types’ that correspond to your Quantum Workspace. Otherwise, you cannot be successfully authenticated!
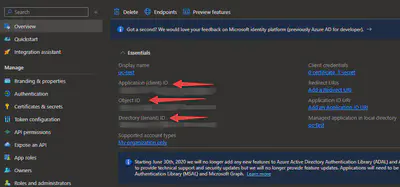
Obtain your credentials: After registering your application, you’ll be directed to the application’s overview page. Here, you’ll find your crucial ‘Application (client) ID’ and ‘Directory (tenant) ID’.
Add API Permission: Go to ‘API permissions’ under ‘Manage’ on the left of the page. Click ‘Add a permission’ and search for ‘Azure Quantum’ and add the permissions you want.
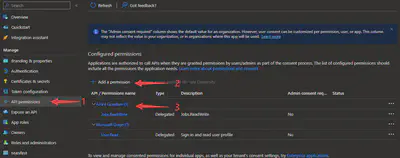
Get
client_secret: Go to ‘Certificates & secrets’ under ‘Manage’ on the left of the page. Click ‘New client secret’ and add one secret. Save the value. Note: the value cannot be seen, so save it or you must create a new secret in the future!
Granting Access
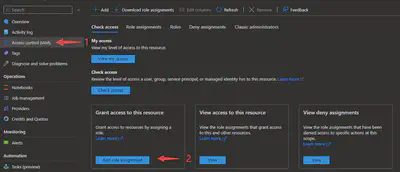
Now we finish registering the application. Besides, we need to add access to this application to access our quantum workspace. Follow the steps below:
Navigate to Azure portal: First, head to the Azure Portal, the starting point for your journey.
Access Quantum Workspaces: Look for the Azure Quantum Workspaces. You can find it by searching it on the search menu at the top of the portal.
Add a role to the application: Click the workspace you want to use, and click ‘Access control (IAM)’. Then click ‘Add role assignment’, and then click ‘Privileged administrator roles’ at the top. Select either ‘Owner’ or ‘Contributor’ and click ‘Next’ below. Click ‘Select members’ of ‘Members’, search for the application we registered just now, and finish the remaining steps.
/oauth2/v2.0/token: Acquiring the Access Token
After the application registration and access granting, now you can use the normal way to obtain the access token.
For example, I used the Python code below:
from requests_html import HTMLSession

session = HTMLSession()

# App Registration
clientId = # Application (client) ID
clientSecret = # Client credentials Secret Value
tenantId = # Directory (tenant) ID

# Get Token
data = {
    "grant_type": "client_credentials",
    "client_id": clientId,
    "client_secret": clientSecret,
    "scope": "https://quantum.microsoft.com/.default"
    }
headers = {"Content-Type": "application/x-www-form-urlencoded"}
r = session.post(f"https://login.microsoftonline.com/{tenantId}/oauth2/v2.0/token", headers=headers, data=data, verify=True)

token_type = r.json()["token_type"]
access_token = r.json()["access_token"]
Because we use the client credential grant flow, we need to specify the grant_type to be client_credentials in the payload, together with client_id and client_secret required by this authentication flow.
Due to that Azure Quantum divides APIs into two categories, which I will introduce in Section: Scopes, you need to choose from either https://quantum.microsoft.com/.default or https://management.azure.com/.default depending on which resources you want to access. Generally speaking, for workspace-related resources, such as listing quantum jobs, use the former; for more high-level resources that are somehow common to other Azure services, such as listing all providers to which you can access, use the latter.
Notice that in the documentation, the URL is said to be https://login.microsoftonline.com/common/oauth2/v2.0/token, but you need to replace common with your tenant ID.
Web API: Retrieve the Data
For JWT, the Bearer token only needs to be included in the headers of the HTTP requests. You can access using the normal HTTP requests now. Before this, please check the input data you need to include in the HTTP requests on your Quantum Workspace Page: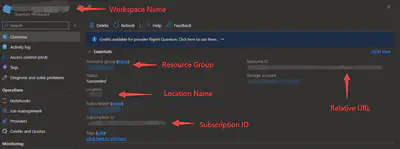
Input the data above, you can access the Azure Quantum REST APIs now. The URL can also be replaced with the ‘Relative URL’ shown in ‘Resource ID’. For other URLs, please check Azure Quantum REST API reference.
# Azure Quantum
subscriptionId = # subscription ID
resourceGroupName = # Resource Group
workspaceName = # Workspace Name
locationName = # Location Name
apiVersion = # API Version of REST APIs, such as "2022-09-12-preview"

# Add the access token
headers = {"Authorization": f"{token_type} {access_token}"}

# Retrieve Data
url = f"https://{locationName}.quantum.azure.com/subscriptions/{subscriptionId}/resourceGroups/{resourceGroupName}/providers/Microsoft.Quantum/workspaces/{workspaceName}/providerStatus?api-version={apiVersion}"
r = session.get(url, headers=headers)
Under the JWT authentication scheme, the header should include Authorization key with the token as the value. Just easy like this and nothing else!
Notice that in the documentation, the URL is said to be https://quantum.azure.com/subscriptions/{subscriptionId}/resourceGroups/{resourceGroupName}/providers/Microsoft.Quantum/workspaces/{workspaceName}/providerStatus?api-version={apiVersion}, but actually, you need to add the location name of your resources in the subdomain, such as eastus.
Submit Quantum Jobs Using HTTP
The case for submitting quantum jobs is a little complicated.
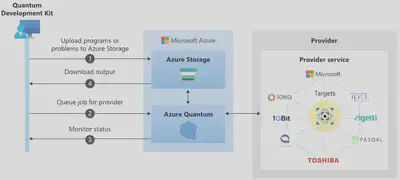
Checking the official doc, the input data is not included in the request body. Instead, because each quantum workspace is connected to Azure Blob Storage service when you created the quantum workspace (which you can find in the overview page of your quantum workspace, named “Storage account”), the input data, such as quantum circuits, are stored as one input file in blob storage, and the shared access signature URI (SAS URI) is included in the request body.
Besides the blob storage service, different quantum computer providers currently may not be compatible with all quantum software development kits. For example, I used the same OpenQASM file generated by Qiskit for both Quantinuum and IonQ. It ran successfully on Quantinuum, while on IonQ it raises the error “Error code: InvalidInputData. Error message: Input data is not valid JSON”. You need to manually transform the formats to meet the requirement of the providers.
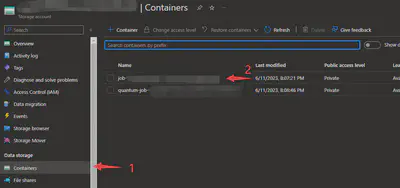
Therefore, the process of submitting quantum jobs is to first create a container in Azure blob storage and upload all input files, and second send the request.
One schematic of job lifecycle is from Work with Azure Quantum jobs:
Create A Container in Azure Blob Storage
Get Access Token
Still, we need to first get the access token for the Azure Blob Storage service. The steps are similar to the steps on how we can get the access token above.
Because it is a totally different service from Azure Quantum, it uses scope https://management.azure.com/.default instead of https://quantum.microsoft.com/.default. However, later I will show how to get the SAS URI. This is actually through the Azure Quantum REST API, so the scope for getting SAS URI is still https://quantum.microsoft.com/.default.
Still, you need to add the API permissions for your app. You can go to “Azure Active Directory” -> “App Registrations” -> Select your APP -> “API Permissions” -> “Add a permission” -> “Azure Storage”.
And then add your app to your storage Identity and access management (IAM). Similar to previous sections, you can click “Storage account” on the “Overview” page of your quantum workspace -> “Access Control (IAM)” -> “Add role assignment”.
After this, the code is similar:
clientId = # Application (client) ID
clientSecret = # Client credentials Secret Value
tenantId = # Directory (tenant) ID

# Get Token
data = {
    "grant_type": "client_credentials",
    "client_id": clientId,
    "client_secret": clientSecret,
    "scope": "https://management.azure.com/.default"
    }

headers = {"Content-Type": "application/x-www-form-urlencoded"}
r = session.post(f"https://login.microsoftonline.com/{tenantId}/oauth2/v2.0/token", headers=headers, data=data, verify=True)
access_token = r.json()["access_token"]
Create Container
You actually do not need to create one container for each job. However, if you run notebooks on Azure Quantum, it will create one container each time you submit one job. Here, I still use this standard.
The name of the container is “job-{jobId}”. At first, I was confused because you can only know the job ID after you submit jobs, but actually, it is standard practice to generate a Universally Unique Identifier (UUID) for such purposes. Actually, this is also used for azure-quantum. If you check the implementation of BaseJob in azure-quantum, it actually uses this standard:
class BaseJob(WorkspaceItem):
    # Optionally override these to create a Provider-specific Job subclass
    """
    Base job class with methods to create a job from raw blob data,
    upload blob data and download results.
    """

    @staticmethod
    def create_job_id() -> str:
        """Create a unique id for a new job."""
        return str(uuid.uuid1())
The code for creating a container is below. Because the blob storage for Azure Quantum is connected and under your specific quantum workspace, all URI parameters here are parameters shown in the overview page of your quantum workspace. Though you can use blob storage under different resource groups, it is much more complicated and you need to edit many access controls, so I prefer to use the default blob storage.
subscriptionId =
resourceGroupName =
workspaceName =
storageAccountName =
jobId = str(uuid.uuid4())
containerName = f"job-{jobId}"  # name of the container to create
apiVersion = "2022-09-01"

headers = {
    "Content-type": "application/json",
    "Authorization": f"Bearer {access_token}"
    }

url = f"https://management.azure.com/subscriptions/{subscriptionId}/resourceGroups/{resourceGroupName}/providers/Microsoft.Storage/storageAccounts/{storageAccountName}/blobServices/default/containers/{containerName}?api-version={apiVersion}"

response = session.put(url, json={}, headers=headers)
Create Input and Output Blobs
The REST API for creating blobs is very complicated, and after I tried and tried, I still either got authentication errors or could not successfully create blobs. However, I found azure.storage.blob can quickly do this and also does not require web page authentication, so I directly use it.
To use azure.storage.blob.BlobServiceClient, you can use the connection string. You can get the connection string by going to your blob storage page from your quantum workspace, and generating the connection string. You can make the time to be longer so that you do not need to generate it again soon in the future.

The code for creating the input file is below:
from azure.storage.blob import BlobServiceClient, ContentSettings
from qiskit import QuantumCircuit

# Specify your circuit here
#---------------------------------------------------
circuit = QuantumCircuit(1, 1)
circuit.h(0)
circuit.measure(0, 0)
qasm_str = circuit.qasm()
#---------------------------------------------------

connectionString = # connection string for your blob storage
blob_service_client = BlobServiceClient.from_connection_string(connectionString)

blob_client = blob_service_client.get_blob_client(containerName, "inputData")
blob_client.upload_blob(qasm_str, content_settings=ContentSettings(content_type='application/qasm'))

blob_client = blob_service_client.get_blob_client(containerName, "rawOutputData")
blob_client.upload_blob("")
The blobs contain information related to quantum jobs, such as quantum circuits. Here I use Qiskit as one example. Notice that if you use a different quantum software development kit, you may need to change content_type='application/qasm' to your input type. Also, the data to upload may be in other formats instead of OpenQASM.
You can check this by running notebook jobs on Azure Quantum and going to the blob storage container, and then checking the blob information:
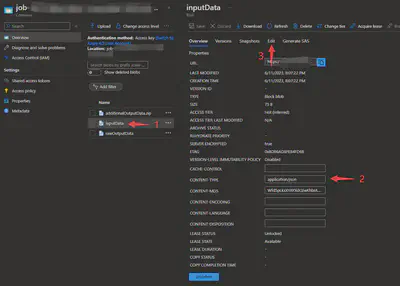
You can also check if the contents of quantum circuits are correct by going to the “Edit” panel.
Here, I also create one blob named “rawOutputData” to store output data.
Submit Jobs
Get SAS URI
According to the official doc, we need to know SAS URI for each blob. This can be done with another REST API under Azure Quantum. I explained previously, because this is an API under Azure Quantum, when you get your token, you should use the scope of Azure Quantum, i.e., https://quantum.microsoft.com/.default.
The code is below. access_token is the access token you get from Azure Quantum, the same as what I have shown previously.
locationName =
apiVersion = "2022-09-12-preview"
url = f"https://{locationName}.quantum.azure.com/subscriptions/{subscriptionId}/resourceGroups/{resourceGroupName}/providers/Microsoft.Quantum/workspaces/{workspaceName}/storage/sasUri?api-version={apiVersion}"

headers = {
    "Content-type": "application/json",
    "Authorization": f"Bearer {access_token}"
    }

payload = {
    "containerName": containerName
}

response = session.post(url, json=payload, headers=headers)
containerSasUri = response.json()["sasUri"]

payload["blobName"] = "inputData"
response = session.post(url, json=payload, headers=headers)
inputSasUri = response.json()["sasUri"]

payload["blobName"] = "rawOutputData"
response = session.post(url, json=payload, headers=headers)
outputSasUri = response.json()["sasUri"]
Submit Jobs
Finally, we are able to submit jobs. The code is below:
jobName =

url = f"https://{locationName}.quantum.azure.com/subscriptions/{subscriptionId}/resourceGroups/{resourceGroupName}/providers/Microsoft.Quantum/workspaces/{workspaceName}/jobs/{jobId}?api-version={apiVersion}"

# provider may lead to job fail

payload = {
    "containerUri": containerSasUri,
    "id": jobId,
    "inputDataFormat": "honeywell.openqasm.v1",
    "itemType": "Job",
    "name": jobName,
    "providerId": "quantinuum",
    "target": "quantinuum.sim.h1-2sc",
    'metadata': {'qiskit': 'True', 'name': jobName, 'num_qubits': '1', 'metadata': 'null', 'meas_map': '[0]'},
    'inputDataUri': inputSasUri,
    'inputParams': {'shots': 100, 'count': 100},
    'outputDataFormat': 'honeywell.quantum-results.v1',
    'outputDataUri': outputSasUri,
}

response = session.put(url, json=payload, headers=headers)
I included some parameters that are not required in payload, and currently it does not have detailed information about how to specify each parameter. These parameters should be straightforward.
But one thing that needs to notice is the thing I mentioned at the beginning of the section: provider really plays a role! I used the same OpenQASM file generated by Qiskit for both Quantinuum and IonQ. It ran successfully on Quantinuum, while on IonQ it raises the error “Error code: InvalidInputData. Error message: Input data is not valid JSON”.
This should be due to inputDataFormat is not compatible. Currently, to submit Qiskit circuit into IonQ, azure-quantum first transforms Qiskit.QuantumCircuit into the JSON format using a function called qiskit_circ_to_ionq_circ. So to run on IonQ, you need to submit circuits in the JSON format instead of OpenQASM. You can check how to specify circuit format by running example circuits on Azure notebooks, and also check azure-quantum to see if there is any preprocessing.
You can find the description of each parameter in the official docs. For example, target, which means the specific quantum processor, they are listed in azure-quantum.azure.quantum.target. Use quantinuum.py as one example, they are listed as this:
class Quantinuum(Target):
    """Quantinuum target."""
    target_names = (
        # Note: Target names on the same line are equivalent.
        "quantinuum.hqs-lt-s1",        "quantinuum.qpu.h1-1",
        "quantinuum.hqs-lt-s1-apival", "quantinuum.sim.h1-1sc",
        "quantinuum.hqs-lt-s1-sim",    "quantinuum.sim.h1-1e",
        "quantinuum.hqs-lt-s2",        "quantinuum.qpu.h1-2",
        "quantinuum.hqs-lt-s2-apival", "quantinuum.sim.h1-2sc",
        "quantinuum.hqs-lt-s2-sim",    "quantinuum.sim.h1-2e"
        "quantinuum.qpu.h2-1",
        "quantinuum.sim.h2-1sc",
        "quantinuum.sim.h2-1e",
    )
Misleading Documentation
Updates 2023-06-01:
I have created PRs to edit the official documentation. Now the documentation is clear and correct, but I still describe the problems I encountered and how I solved them here in this article.
I am struggling with the URL and the payload of the HTTP requests, and I found that it is due to the misleading or wrong descriptions in Azure Quantum REST API reference. You may get the wrong URLs or scopes by searching on the official documents.
For example, on the documentation page for ‘Jobs - Get’, it shows the security information below: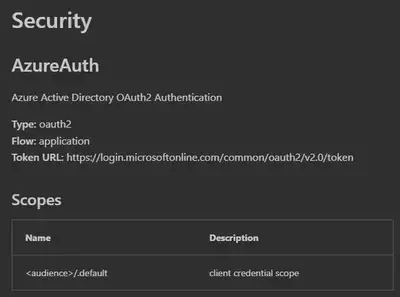
The ‘Token URL’ uses ‘common’ for tenant ID, but actually, if you register for a client credential, this should be replaced with the tenant ID of your application.
What’s more, in the scope, it is listed as <audience>/.default, but no information about what should be used to replace <audience>.
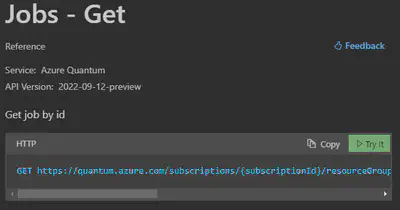
A more surprising thing is that even if you run the HTTP requests on the document page, it cannot get a successful response, because the URL is wrong! You need to add the location name at the beginning of the URL.
Here I list some correct values you should use for URLs and scopes. Notice that this may be changed in the future, and I have not tested for all APIs. But I also list how you may get the correct data by checking the source code of azure-quantum.
URL
Currently, URLs related to Azure Quantum are divided into 2 categories:
Data Plane:
https://{locationName}.quantum.azure.com/subscriptions/{subscriptionId}/resourceGroups/{resourceGroupName}/providers/Microsoft.Quantum/workspaces/{workspaceName}/providerStatus?api-version={apiVersion}. This is the URL related to Azure Quantum data plane, such as jobs, providers information, quotas, etc.. Noticed that you need to addlocationNameat the beginning as the subdomain, which is not listed in the official documentation now. Location name is the name of the resource location, such aseastus.Resource Manager:
https://management.azure.com/subscriptions/{subscriptionId}/resourceGroups/{resourceGroupName}/providers/Microsoft.Quantum/workspaces/{workspaceName}?api-version={apiVersion}. This is the URL related to more high-level Azure resource manager, which you can think that this is more general information that may be used similarly with cloud services other than Azure Quantum, such as workspace.
Scopes
The scope needs to be specified to get the access token. Currently, in the official documentation, the scope depends on the Azure authentication flow. For data plane APIs, many of them use “oauth2 application”, and the scope is listed as <audience>/.default. For resource manager APIs, many of them use “oauth2 implicit”, and the scope is listed as user_impersonation.
However, in my testing, it seems that we do not need to change the flow, i.e., we can use the client credential grant flow I introduced in this article. The <audience> just needs to be replaced with the domain name. For example, https://quantum.microsoft.com/.default is used for acquiring the access token for data plane APIs, and https://management.azure.com/.default is used for acquiring the access token for resource manager APIs.
Checking azure-quantum Python Module
Because the documentation may be misleading, I list here how I got through the problem and implement the correct requests in the end. The implementation may be changed in the future, so please be careful.
High-Level Operations
In Azure Quantum tutorial notebooks, the workspace can be accessed by different classes depending on the quantum software development kit.
For example, Q# for IonQ:
import qsharp.azure

targets = qsharp.azure.connect(
            resourceId = "/subscriptions/ac5e19b7-70ce-45db-be10-4ea56849f909/resourceGroups/AzureQuantum/providers/Microsoft.Quantum/Workspaces/test-qcmapping",
            location = "eastus")
Qiskit for Quantinuum:
from azure.quantum.qiskit import AzureQuantumProvider
provider = AzureQuantumProvider(
            resource_id = "/subscriptions/ac5e19b7-70ce-45db-be10-4ea56849f909/resourceGroups/AzureQuantum/providers/Microsoft.Quantum/Workspaces/test-qcmapping",
            location = "eastus")
Cirq for IonQ:
from azure.quantum.cirq import AzureQuantumService

service = AzureQuantumService(
            resource_id = "/subscriptions/ac5e19b7-70ce-45db-be10-4ea56849f909/resourceGroups/AzureQuantum/providers/Microsoft.Quantum/Workspaces/test-qcmapping",
            location = "eastus")
Data Plane Request
However, for REST APIs, azure-quantum provides some classes for accessing, such as Workspace and QuantumClient. Workspace classs has a private attribute _client which will return QuantumClient, and this attribute is actually created by calling Workspace._create_client():
def _create_client(self) -> QuantumClient:
    endpoint = BASE_URL(self.location)
    logger.debug(
        f"Creating client for: subs:{self.subscription_id},"
        + f"rg={self.resource_group}, ws={self.name}, frontdoor={endpoint}"
    )

    client = QuantumClient(
        credential=self.credentials,
        subscription_id=self.subscription_id,
        resource_group_name=self.resource_group,
        workspace_name=self.name,
        endpoint=endpoint,
        user_agent=self.user_agent
    )
    return client
the first line is our target. The endpoint, which will be used as the domain (or base URL) for HTTP requests sent by QuantumClient, is actually BASE_URL formatted by self.location, which is defined as:
BASE_URL = (
    lambda location: BASE_URL_FROM_ENV
    or f"https://{location}.quantum.azure.com/"
)
this means the location should be placed as the subdomain, which is not shown in the current version of the documentation.
The data plane APIs are actually operating through QuantumClient. To get the access token, Workspace packages the credential in _DefaultAzureCredential, and this will be an input for creating QuantumClient. Then QuantumClinet packages the credential with QuantumClientConfiguration, which shows the scope in __init__():
self.credential_scopes = kwargs.pop("credential_scopes", ["https://quantum.microsoft.com/.default"])
In the implementation of QuantumClient, it contains a series of operations, which are the classes that actually access APIs. For example, the HTTP request to list jobs is built with build_jobs_list_request() defined in this file:
def build_jobs_list_request(
    subscription_id: str, resource_group_name: str, workspace_name: str, **kwargs: Any
) -> HttpRequest:
    _headers = case_insensitive_dict(kwargs.pop("headers", {}) or {})
    _params = case_insensitive_dict(kwargs.pop("params", {}) or {})

    api_version: Literal["2022-09-12-preview"] = kwargs.pop(
        "api_version", _params.pop("api-version", "2022-09-12-preview")
    )
    accept = _headers.pop("Accept", "application/json")

    # Construct URL
    _url = "/subscriptions/{subscriptionId}/resourceGroups/{resourceGroupName}/providers/Microsoft.Quantum/workspaces/{workspaceName}/jobs"  # pylint: disable=line-too-long
    path_format_arguments = {
        "subscriptionId": _SERIALIZER.url("subscription_id", subscription_id, "str"),
        "resourceGroupName": _SERIALIZER.url("resource_group_name", resource_group_name, "str"),
        "workspaceName": _SERIALIZER.url("workspace_name", workspace_name, "str"),
    }

    _url: str = _format_url_section(_url, **path_format_arguments)  # type: ignore

    # Construct parameters
    _params["api-version"] = _SERIALIZER.query("api_version", api_version, "str")

    # Construct headers
    _headers["Accept"] = _SERIALIZER.header("accept", accept, "str")

    return HttpRequest(method="GET", url=_url, params=_params, headers=_headers, **kwargs)
The detailed payload of the HTTP request can be found in such functions, and notice that the base URL is the URL introduced previously.
Resource Manager Request
Because resource manager related APIs use OAuth 2.0 implicit grant flow, it seems that in the code they do not provide scope for this, and the authentication is done by manually logging to the webpage as I mentioned before.
I tried to get the access token by changing the scope from https://quantum.microsoft.com/.default to https://management.azure.com/.default, because the domain is changed for these APIs. Fortunately, this can get the access token and everything works perfectly in the end.
Conclusion
This article introduces how to access Microsoft Azure Quantum through HTTP requests. This article is related to more low-level things. Though I have not tried, it may be able to set the credential as one input for client classes, so that the authorization flow that requires login can be changed to the client credential grant. In this case, you can use azure-quantum modules with different programming languages more easily, without considering reinventing the wheel.
Chuanqi Xu
Ph.D. Student
I am a PhD candidate at Yale University. My current research focuses on quantum computing and computer security, where I design novel attacks and defenses targeting quantum computers and quantum cloud providers. Specifically, my work explores security and privacy across the entire technology stack of quantum computers:
- Investigating vulnerabilities in quantum processors and qubit technologies.
- Developing secure and private quantum computer systems and architecture.
- Ensuring the security of quantum algorithms, with a focus on quantum machine learning (QML).
Previously, I worked on RTL design (Verilog) for FPGAs, implementing Post-Quantum Cryptography (PQC) that is secure to both classical and quantum computer attacks.
I am actively seeking roles as a research scientist, software engineer, and quant researcher. I am broadly interested in developing systems and infrastructure, especially for ML/GenAI infrastructure and systems.