What is HTTPS and How to Enable HTTPS on Your Own Server
 What is HTTPS credit: What is HTTPS? Everything You Need to Know
Table of contents
What is HTTPS?
Background: All requests are in plaintext when using HTTP protocol, so anybody can intercept and eavesdrop on the requests. Therefore, if you send data that needs to be secured over HTTP, such as your password, or credit card information, your data have a great possibility to be leaked.
Encryption
- Q: How to make HTTP requests more secure?

A: Of course, we can use some encryption protocol to encrypt the request, and make sure that only the client and the server can decrypt the encrypted requests. If so, even though there is someone intercepts the request, he or she cannot know anything about it.
So Here comes the first additional feature of HTTPS over HTTP. The requests between the client and the server will be encrypted by some encryption protocols.
- Q: I have some knowledge about encryption. I remember that many encryption protocols need the key to encrypt and decrypt the message. Before we share the key, we can only use HTTP to communicate with the server, and thus the process of sharing the key needs to be encrypted. But then, the same problem comes again. If we want to encrypt the process of sharing a key, we must share a key before this process… It becomes an infinite loop and how to solve this?
A: If you know asymmetric encryption, then you have already known the answer :) The answer is to let the server send its public key to the client, and the client can generate a key and encrypt it with the server’s public key and send it to the server. Then this new key is securely shared.
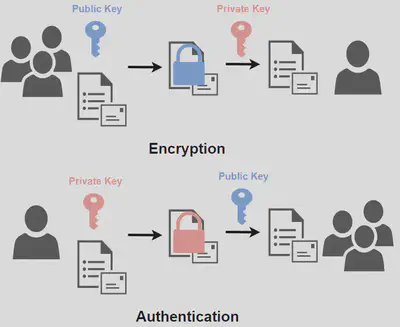
If you do not know asymmetric encryption, asymmetric encryption uses two kinds of keys, which are called the public key and the private key. They are just like the lock and the key. Any data signed (encrypted) by the public key can only be decrypted by the secret key, and vice versa.
Therefore, one can generate its own public and private key, and share the public key with the public (just like the name shows). The keys are mainly used for two purposes:
- Encryption: if anybody wants to securely send data to the key owner, he or she can encrypt the data with the public key, so only the owner can decrypt it.
- Authentication: the owner can sign the data with its private key, and when other people received the data that is said to be sent by the key owner, they can decrypt it with the owner’s public key to see if it is signed by the owner’s private key.
So to enable the encryption of HTTPS, we can use the encryption purpose of the asymmetric encryption protocol to share the key. This is done by letting the server send its public key to the client, and then the client can encrypt the newly generated key with this public key. This newly generated key can be used to encrypt further requests in the following during the session, so it is often called the session key.
- Q: OK, now I know how to enable the encryption. But why do we need a new session key instead of using the server’s public key to encrypt all the data?
A: There are two reasons:
- The client can send the data signed by the server’s public key and only the server can decrypt it. But the server cannot send the data signed by its private key because anybody else knows its public key so they can decrypt it.
- We can solve the above problem by also having the asymmetric keys on the client side. The second reason is that asymmetric encryption protocol is very computationally expensive. Since we can securely send the new key with the asymmetric protocol and only need to send it once, we can use the symmetric encryption protocol to encrypt the following requests.
Authentication
- Q: Wait… We can do this with anybody, right? We may communicate with an attacker pretending to be a server. It is not secure!
A: This is right!
To solve this, the client needs to verify that the public key received from the connection is the public key sent by the exact server with which the client wants to communicate.
This can also be done with the asymmetric encryption protocol by using the authentication purpose of the asymmetric encryption protocol. You can sign the public key with a private key, so that the client can verify it.
- Q: Uh, yes, this is awesome… Wait… there is something wrong… Where does this new private key come from? It can not be generated by the server because it makes no sense, right? And if this new private key is generated by the client, then the client needs to share the key, and it comes back to the infinite loop again!
A: Haha, I left out one important concept in the explanation, but you still find it. This is great.
To solve the infinite loop, actually, we cannot do anything… Following this infinite loop, at the start point, is the trust. You must trust something to make all this happen.
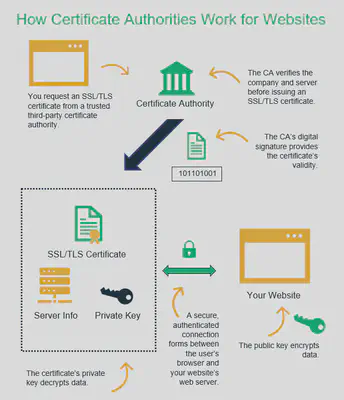
To sign the public key of the server, we need authority. The authority signs the server’s public key with the authority’s private key, and the clients can use the authority’s public key to verify that this is from the correct server instead of attackers.
In order to show the identity of the server, the authority often signs the server’s public key together with other information, such as the domain name, subdomains, organization of the server, etc. All this information is gathered together and signed by the authority to create what is called a certificate, and this authority is called certificate authority (CA). Instead of directly sending the public key, the server usually sends the certificate.
But the infinite loop still exists. How can we trust this authority? The answer is that above it, this authority is signed by another authority. And in the end, you must trust an authority… I know it feels not secure, but in the real world, it is like this.
The trusted authorities are usually stored in the operating systems or the web browsers. For example, you can find it under /etc/ssl/certs on Linux.
- Q: How does the server acquire the certificate?
A: This includes the interaction between the server and the CA. A typical process is:
Generate the public and private keys.
Create a Certificate Signing Request (CSR). The CSR usually includes information such as the domain name(s), the contact information for the person requesting the certificate, and of course, the public key.
Submit the CSR to a Certificate Authority (CA): The CSR is then submitted to a trusted CA, such as Let’s Encrypt, Comodo, or Symantec. The CA will use the information in the CSR to create a digital certificate that verifies the identity of the server. Before issuing a certificate, the CA will typically require some form of domain ownership verification to ensure that the person requesting the certificate is authorized to use the domain name. This may involve sending an email to a specific email address associated with the domain, adding a DNS record to the domain’s DNS configuration, or uploading a verification file to the server.
- Q: What if there are some attackers in the middle who send the same certificate to impersonate the server?
I explained previously that asymmetric encryption is used for the secure sharing of the session key. Everything after the secure connection establishment will be encrypted with the session case. In this case, even though there may be some attackers impersonating the server, they cannot decrypt it to get the session key because they do not have the server’s private key.
The attackers may instead send different certificates to impersonate the server. If these attackers’ certificates are signed by a trusted CA, then such CA will not sign the certificate for the same domain name (though a corrupted CA may do), because the issuing of certificates requires verifying that the petitioner has control of the domain name and attackers cannot pass the verification. Thus, the certificates must contain different domain names or other information. On the other hand, if these certificates are forged, they cannot be signed by a trusted CA because the signing needs the CA’s private key. Either case will lead the browser to warn that the certificate is not valid. You may have seen this warning before.

Summary
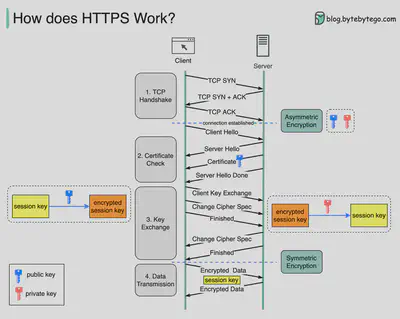
- For simplicity, HTTPS can be thought of as adding encryption to HTTP.
- To enable encryption, the key must be shared between clients and servers.
- To share the key, servers send their certificates (which contain their public keys) to clients, and clients sign session keys with these public keys and send them to servers.
- For efficiency, after agreeing on session keys, they will be used to encrypt further requests.
- To make sure servers are the exact servers instead of attackers, certificate authorities are needed to sign servers’ certificates, and we need to trust some CAs to make all these happen.
How to Enable HTTPS on Your Server
As explained above, to enable HTTPS on the server, two things are needed:
- Domain name for the server (because certificates usually include domain names as one of the information)
- Certificate for that domain name.
I used Cloudflare as one example because it provides free certificates, while it usually needs to pay for certificates. I also registered my domain name on Cloudflare.
For the web server, I choose nginx
Content Delivery Networks (CDN)
Under the SSL/TLS section of the domain name dashboard, there are several choices.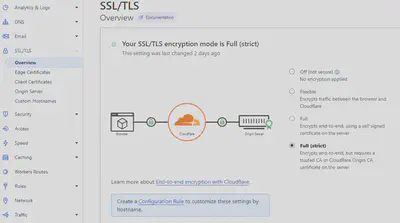
Just like the figure shows, domain names with Cloudflare can have Cloudflare as the tunnel for traffic between clients and the origin server. This intermediate service is called the Content Delivery Network (CDN).
Communication between clients and the origin server is divided into two parts:
- All data transfers from clients are exchanged only directly with the CDN.
- CDN then communicates with the origin server.
Here are 4 kinds of encryption modes:
- Off: all data transfers in both routes are not encrypted with HTTPS.
- Flexible: only data transfers between clients and Cloudflare is over HTTPS. But data transfers between Cloudflare and the origin server are not encrypted.
- Full: all data transfers in both routes are encrypted, but the validity of the origin server is not guaranteed. So the interaction between Cloudflare and the origin server may be forged by the attackers.
- Full (strict): all data transfers in both routes are encrypted, and also the validity of the origin server is guaranteed.
If you want to encrypt the data transfers between clients and Cloudflare, just set the encryption mode to be anything except “Off”
Encrypt Traffic Between the CDN and the Origin Server
Because Cloudflare provides free certificates, it is better to choose the “Full (strict)” mode.
To get the free origin certificate from Cloudflare, you can follow the instructions
After generating the certificate, store both the certificate and the key files in a secure directory that cannot be accessed by the web application. The key file is the private key corresponding to the public key in the certificate signing request (CSR). You can also generate by yourselves.
For the Nginx configuration, set:
listen 443 ssl http2;
ssl_certificate       path/to/certificate;
ssl_certificate_key   path/to/key;
Notice that the hostname must be one of the domain names in the certificate.
Further Options to Protect the Origin Server
There are a few other options you can choose to further protect your origin server:
Authenticated Origin Pulls:
This ensures requests to your origin server come from the Cloudflare network. All requests need to provide a client certificate to verify the client’s identity. If you set up this feature, it only allows Cloudflare to make the request to your origin server so that all requests need to go first into Cloudflare and no request can directly be sent to your origin server.
Follow the instructions to set up. It needs to download the Cloudflare certificate (this time it is for the client certificate), and set up the Nginx configuration:
ssl_client_certificate /etc/nginx/certs/cloudflare.crt;
ssl_verify_client on;
Deny all non-CDN requests:
Only allow Cloudflare IP (can be found in Cloudflare IP Ranges). Create a file and include all these IPs. Such as (notice that the IPs below may change in the future):
# https://www.cloudflare.com/ips
# IPv4
allow 173.245.48.0/20;
allow 103.21.244.0/22;
allow 103.22.200.0/22;
allow 103.31.4.0/22;
allow 141.101.64.0/18;
allow 108.162.192.0/18;
allow 190.93.240.0/20;
allow 188.114.96.0/20;
allow 197.234.240.0/22;
allow 198.41.128.0/17;
allow 162.158.0.0/15;
allow 104.16.0.0/12;
allow 172.64.0.0/13;
allow 131.0.72.0/22;

# IPv6
allow 2400:cb00::/32;
allow 2606:4700::/32;
allow 2803:f800::/32;
allow 2405:b500::/32;
allow 2405:8100::/32;
allow 2a06:98c0::/29;
allow 2c0f:f248::/32;
In nginx configuration, add:
include cf.conf;
deny all;
References
Chuanqi Xu
Ph.D. Student
I am a PhD candidate at Yale University. My current research focuses on quantum computing and computer security, where I design novel attacks and defenses targeting quantum computers and quantum cloud providers. Specifically, my work explores security and privacy across the entire technology stack of quantum computers:
- Investigating vulnerabilities in quantum processors and qubit technologies.
- Developing secure and private quantum computer systems and architecture.
- Ensuring the security of quantum algorithms, with a focus on quantum machine learning (QML).
Previously, I worked on RTL design (Verilog) for FPGAs, implementing Post-Quantum Cryptography (PQC) that is secure to both classical and quantum computer attacks.
I am actively seeking roles as a research scientist, software engineer, and quant researcher. I am broadly interested in developing systems and infrastructure, especially for ML/GenAI infrastructure and systems.